07/09/16
In today's lesson, I learnt about the basic terminology of animation. Today, I mainly learnt about FPS (Frame per second) and Juxtaposition. At first, I thought FPS meant First person shooter, as this is a term I am familiar with in gaming but as the lesson progressed, realised this is completely different. The other term learnt was juxtaposition, "Juxtaposing"is the placement of two or more things side by side, often in order to bring out their differences.
Frame rate refers to the number of images displayed per second. The greater the FPS, the smoother the video motion appears, however a game running at 60 FPS will look smoother if everything is working as it should be, providing the power is there to back it up, but this, is not always the case. If a game has a lot going on in a massive environment, sometimes it is better to use a lower frame rate like 30 FPS because the user would have a much smoother experience rather than having the application jittering and running slowly which could hinder their experience.
FPS (Frames per second)
TV (Europe) – 25 FPS
Cinema - 24 or 48 FPS (The Hobbit was first films to be
release in 48FPS)
Video Games – 30 or 60 FPS
Animation Methods
I was introduced to animation methods like hand drawn, still images and adding 2D animation over a pre-recording. Hand Drawing animations is where each frame is drawn by hand, this is also known as Traditional Animation. This technique was the dominant form of animation in cinema until the introduction of computer animation, for example the 1995 Toy Story movie was the first to use full Computer Generated Imagery (CGI) film. However CGI was first used in the early 1960's.
Example
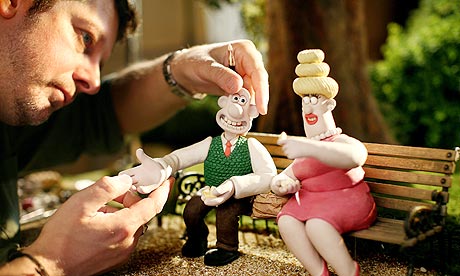
Another technique, I learnt was Stop Motion Animation which is using materials to create a set and models, which you then
photograph. Popular materials used in this method includes clay and lego.

Live Action Animation films is a film genre that combines live action and computer animation by creating drawn 2D animation over a pre-recorded video. This can also include portraying animated characters interacting with real life cast members. I found this quite interesting to see that you can involve real life characters with animations. A good example of this is seen in the film 'Space Jam' and as early as the film 'Who Framed Roger Rabbit'.

By the end of today lesson I had to create my own bouncing ball animation using Key frames
All animation productions should always begin with a plan or a good storyline. Without this it could lead to confusion later down the line, so you need to set out properly, what you want to create. I therefore, gave my bouncing ball a story, despite this style of animation being very basic. I replicated the following image as found online. The story of my ball was for it to start from the left, bounce in the middle and then bounce off screen to the right.

Short Keys
In Adobe Animate CC I've learnt some very useful short keys, F5 and F6, F5 is used to insert frames and F6 is used to insert key frames, this is very time effective, compared to just clicking right over and over again.
My Video
To get my file onto this blog I had to change my file into a video or it would turn into a Small Web Format (SWF) file. I did this because if I uploaded this as a Graphic Interchange Format (GIF) onto the blog my animation would lose quality. I changed the file into MPEG-4 (MP4) file and uploaded it to Youtube to maintain the quality.
Bibliography:
--------------------------------------------------------------------------------------------------------------------------
In today's lesson we were asked to create a character on Photoshop using objects that you can find in a normal household. I wanted to create a samurai theme so I went on to google to find an inspiration image. The household images I selected were a plate, forks and a kettle I also used some vegetables like corn , potato and carrots just to make the image look more organic


I found this task quite fun to do as it was something different because I usually use Photoshop to just Edit images, so it was refreshing to use Photoshop to create our own models
Bibliography:
--------------------------------------------------------------------------------------------------------------------------
In today's lesson we learnt how to create our own Stop Motion Animation. Stop motion is an animation technique that physically manipulates (what does it manipulate?) so that it appears to move on its own. The object is moved in small increments between individually photographed frames, creating the illusion of movement when the series of frames is played as a continuous sequence. The camera we used to take the pictures was a Coolpix l830.
Juxtaposing is used in Stop Motion animation, every frame is side by side however they are all different.
My work
This animation method is probably the most tedious out of the three because you have to move the objects every picture frame, however, this animation was pretty fun to do in a group and I wouldn't mind doing it again.
--------------------------------------------------------------------------------------------------------------------------
In today's lesson we were learning how to use the Liquify tool. The Liquify tool is one of the most powerful image editing tools in Photoshop. It will allow you to push, pull, rotate, pucker, and bloat any area of an image.
Original Picture

In this picture I pulled down my subject lips to make it look like he's pulling a sad face

I used the Liquify tool to make my subject look out of this world, so I gave him the classic super saiyan hair line by pulling down on his hair line and I used the clone stamp tool to copy his collar of his jacket for his beard. I used the full stamp tool because I felt it would make him look more out of this world.

The Liquify can also be used to make gifs. i created this gif by using this Liquify tool to close this eye and I add the original image and the liquify image to the timeline on photoshop and put them on an endless loop

--------------------------------------------------------------------------------------------------------------------------
In today's lesson we were drawing character models on Photoshop and exporting them into adobe Illustrator.
I used the line tool to draw this character because its what I'm most comfortable with however i want to improve my brush skills on the digital table, for the next time I create a character I won't be relying on the line tool

I enjoyed this lesson it was our first lesson where we made our own character models. For my character, I used the line tool to create shadows in areas to give it a more 3D effect.
--------------------------------------------------------------------------------------------------------------------------
Homework
For my homework I was told to do a animation showing movement, so I created a man walking down a street. Instead of drawing his whole body and doing a proper walking animation, I used a method that's commonly used in anime, where the character moves up and down while the background is moving. I used the Classic Tween tool to make my character go up and down and I used the classic Tween tool to also make my background move side to side.
--------------------------------------------------------------------------------------------------------------------------
Rotoscoping
Rotoscoping is an animation technique in which animators trace over footage, frame by frame, for use in live action and animated movies.
Rotoscoping is a vital process for visual effects, whether you need to take out elements from live action footage or add elements in.
Stages of rotoscoping
Filming
Animating
Editing

I personally, like this type of animation because you are combining the 2D world with the 3D world however the process is time consuming like, Stop motion.
--------------------------------------------------------------------------------------------------------------------------
Today we were introduce to a website called soundsdogs, (http://www.sounddogs.com/) soundsdogs is a website where you can buy and download free sounds. We were also introduced to Adobe Audition. Adobe Audition is a sound software used to edit sounds on the mixer. When we downloaded the sounds from sounds dogs we then put them into Adobe Audition mixer. I had trouble with my downloads in Auditions, all my files were showing as offline. Although, I checked with other colleagues and my teacher, I could not find a solution for this which meant I was not able to complete the task. This was not my most enjoyable lesson.

--------------------------------------------------------------------------------------------------------------------------
In today's lesson we learnt how to use Layer Mask. Layer masks are a tool used for image manipulation. They allow you to selectively modify the transparency of the layer they belong to.
To combine the pictures you have to use Black and White which control the transparency of the layer. Using a white brush in a layer mask, means 100% visibility and using a Black brush in a layer means it is 100% transparent.
For today's activity I was told to use a local monument in my area and make it look futuristic or Old. I decided, to give the Shri Swaminarayan Mandir Temple an Ancient jungle temple theme by giving it a lot of rust and adding some jungle vines.
I was very happy with this work however, when I saved it and added it to my blog the image had gaps on it. I am not sure why my the image had gaps, I spoke with my teacher but we were both could not resolve the issue. The only assumption is saving as a jpeg image, which is the only save method we can use to upload to the blog.


By the end of today lesson I had to create my own bouncing ball animation using Key frames
All animation productions should always begin with a plan or a good storyline. Without this it could lead to confusion later down the line, so you need to set out properly, what you want to create. I therefore, gave my bouncing ball a story, despite this style of animation being very basic. I replicated the following image as found online. The story of my ball was for it to start from the left, bounce in the middle and then bounce off screen to the right.

Short Keys
In Adobe Animate CC I've learnt some very useful short keys, F5 and F6, F5 is used to insert frames and F6 is used to insert key frames, this is very time effective, compared to just clicking right over and over again.
To get my file onto this blog I had to change my file into a video or it would turn into a Small Web Format (SWF) file. I did this because if I uploaded this as a Graphic Interchange Format (GIF) onto the blog my animation would lose quality. I changed the file into MPEG-4 (MP4) file and uploaded it to Youtube to maintain the quality.
Bibliography:
- dermot. (2010). tutorial-2 : walk cycle. Available: http://www.angryanimator.com/word/2010/11/26/tutorial-2-walk-cycle/. Last accessed 7th sep 2016.
- Lollar. (2000). Space Jam Theme Song. Available: http://www.themoviethemesong.com/space-jam-movie-theme-song/. Last accessed 7th sep 2016.
- AnimDesk. (2012). The Principles of Animation – Squash and Stretch.Available: https://www.animdesk.com/the-principles-of-animation-squash-and-stretch/. Last accessed 7th sep 2016.
- Alex Maidy. (2014). THE FINAL POSTER FOR INTERSTELLAR MAY BE A BIG SPOILER. Available: http://www.joblo.com/movie-news/the-final-poster-for-interstellar-may-be-a-big-spoiler-717?utm_medium=twitter&utm_source=twitterfeed. Last accessed 7th sep 2016.
--------------------------------------------------------------------------------------------------------------------------
08/09/16


I found this task quite fun to do as it was something different because I usually use Photoshop to just Edit images, so it was refreshing to use Photoshop to create our own models
Bibliography:
- mythagogia. (2013). ΜΥΘΑΓΩΓΙΑ - MYTHAGOGIA. Available: http://mythagogia.blogspot.co.uk/2013_03_01_archive.html. Last accessed 8th sep 2016.
--------------------------------------------------------------------------------------------------------------------------
09/09/16
In today's lesson we learnt how to create our own Stop Motion Animation. Stop motion is an animation technique that physically manipulates (what does it manipulate?) so that it appears to move on its own. The object is moved in small increments between individually photographed frames, creating the illusion of movement when the series of frames is played as a continuous sequence. The camera we used to take the pictures was a Coolpix l830.
Juxtaposing is used in Stop Motion animation, every frame is side by side however they are all different.
My work
This animation method is probably the most tedious out of the three because you have to move the objects every picture frame, however, this animation was pretty fun to do in a group and I wouldn't mind doing it again.
--------------------------------------------------------------------------------------------------------------------------
12/09/16
In today's lesson we were learning how to use the Liquify tool. The Liquify tool is one of the most powerful image editing tools in Photoshop. It will allow you to push, pull, rotate, pucker, and bloat any area of an image.
Original Picture

In this picture I pulled down my subject lips to make it look like he's pulling a sad face


The Liquify can also be used to make gifs. i created this gif by using this Liquify tool to close this eye and I add the original image and the liquify image to the timeline on photoshop and put them on an endless loop
--------------------------------------------------------------------------------------------------------------------------
15/09/16
I used the line tool to draw this character because its what I'm most comfortable with however i want to improve my brush skills on the digital table, for the next time I create a character I won't be relying on the line tool

I enjoyed this lesson it was our first lesson where we made our own character models. For my character, I used the line tool to create shadows in areas to give it a more 3D effect.
--------------------------------------------------------------------------------------------------------------------------
16/09/16
Homework
For my homework I was told to do a animation showing movement, so I created a man walking down a street. Instead of drawing his whole body and doing a proper walking animation, I used a method that's commonly used in anime, where the character moves up and down while the background is moving. I used the Classic Tween tool to make my character go up and down and I used the classic Tween tool to also make my background move side to side.
Feedback, I received on my homework was to add more elements to the animation like make the mouth move or his eyes blink.
My inspiration
(12:56 - 13:00)
Bibliography:
- Awesome Bro123. (2015). Monster Episode 17 English Subbed.Available: https://www.youtube.com/watch?v=HtPZdjP__sQ. Last accessed 15th sep 2016.
--------------------------------------------------------------------------------------------------------------------------
16/09/26
Rotoscoping is an animation technique in which animators trace over footage, frame by frame, for use in live action and animated movies.
Rotoscoping is a vital process for visual effects, whether you need to take out elements from live action footage or add elements in.
Stages of rotoscoping
Filming
Animating
Editing
 |
| ( Zoomed in image of the Effect Controls) |

For my rotoscoping I wanted to to do an animation where my character is getting blown away. I noticed the person in the video was doing a power up from the anime series Dragon ball, so I took advantage of that and added a super saiyan light around the character. After, I finished all the animations, I added a green background over all the layers. I then exported the animation over to Adobe Premiere and used the Video effect on Adobe premiere to Key out the background and combine both the video and the animation together.
My Video
I personally, like this type of animation because you are combining the 2D world with the 3D world however the process is time consuming like, Stop motion.
--------------------------------------------------------------------------------------------------------------------------
20/09/16
Today we were introduce to a website called soundsdogs, (http://www.sounddogs.com/) soundsdogs is a website where you can buy and download free sounds. We were also introduced to Adobe Audition. Adobe Audition is a sound software used to edit sounds on the mixer. When we downloaded the sounds from sounds dogs we then put them into Adobe Audition mixer. I had trouble with my downloads in Auditions, all my files were showing as offline. Although, I checked with other colleagues and my teacher, I could not find a solution for this which meant I was not able to complete the task. This was not my most enjoyable lesson.

22/09/2016
In today's lesson we learnt how to use Layer Mask. Layer masks are a tool used for image manipulation. They allow you to selectively modify the transparency of the layer they belong to.
To combine the pictures you have to use Black and White which control the transparency of the layer. Using a white brush in a layer mask, means 100% visibility and using a Black brush in a layer means it is 100% transparent.
For today's activity I was told to use a local monument in my area and make it look futuristic or Old. I decided, to give the Shri Swaminarayan Mandir Temple an Ancient jungle temple theme by giving it a lot of rust and adding some jungle vines.
I was very happy with this work however, when I saved it and added it to my blog the image had gaps on it. I am not sure why my the image had gaps, I spoke with my teacher but we were both could not resolve the issue. The only assumption is saving as a jpeg image, which is the only save method we can use to upload to the blog.

First I had to eliminate the original egg so I used the clone stamp tool to copy the background on top of the original egg after I used the clone state tool I noticed some like smudges so I used the patch tool to clean it up. After I successfully removed the egg I found a picture of a bubble and copied and pasted it where I removed the egg next I used the warp tool to give the bubble the same shape of the egg and lowed its transparency then I used the layer mask tool to brush in the yolk inside of the bubble.

--------------------------------------------------------------------------------------------------------------------------
23/09/16
Here is my group project work on creating a advert
My job in the group was to create the props


My Video
--------------------------------------------------------------------------------------------------------------------------
06/10/16
In today's lesson, we were introduced to the Pen tool in Adobe illustrator, adobe Illustrator is a program used by both artists and graphic designers to create vector images. Vector images allow you to create clean, beautiful work of art that can be scaled up and down without ever losing its quality.
I didn't like using adobe Illustrator Pen tool because I felt like it was harder to use than Adobe Photoshop and Adobe Animate Pen tool because the I felt like I had no control over the Pen & sometime I couldn't even see my line.

There is more research and writing to add about sound. You need to write about using recording sounds on location, using microphones and types of microphone. You also need to mention the session on bit rate and sample rate, to show you have an understanding of how sound files work. There are notes on Study space.
ReplyDelete